Table of Contents
- Machine learning speed test comparison using Apple M1 Pro and M1 Max released in 2021
- hardware specs
- Experiment 1: Final Cut Pro export (small vs. large video)
- Experiment with large videos
- Experiment with small videos
- Experiment 2: Image classification with CreateML
- Experiment 3: Image classification with TinyVGG model for CIFAR10 using TensorFlow
- Experiment 4: EfficientNetB0 feature extraction for Food101 dataset using tensorflow-macos
- Which one should i buy?
- Summary
Machine learning speed test comparison using Apple M1 Pro and M1 Max released in 2021
The main keyboard (Google ) I use is attached to my MacBook Pro. I put this keyboard on top of my MacBook Pro and type.
Apple has released several new MacBook Pros with hardware upgrades. They consist of redesigns using the M1 Pro and M1 Max chips and more, but being a tech geek I decided to give them a try.
I usually use my MacBook Pro to make machine learning videos, write machine learning code, and teach machine learning.
This article will focus on:
Compare Apple’s M1, M1 Pro, and M1 Max chips to each other and even to several other chips.
how to compare
Run and compare the following four tests.
- Exporting Final Cut Pro – Various MacBook Pros export a 4 hour long TensorFlow explainer video (a coding instructional video I made) and a 10 minute long story video (using H.264 and ProRes encoding). How fast can you write?
- Creating an Image Classification Machine Learning Model with CreateML – How fast can various MacBook Pros convert 10,000 images into an image classification model using CreateML?
- Image classification with TinyVGG model targeting CIFAR10 with TensorFlow ( using tensorflow -macos
) – thanks to tensorflow -metal , I can now leverage the MacBook’s built-in GPU to accelerate machine learning model training . How fast would a small model be? - EfficientNetB0 feature extraction on Food101 dataset using tensorflow -macos – I rarely train machine learning models from scratch. So how do the new M1 Pro and M1 Max chips perform transfer learning with TensorFlow code?
This article focuses strictly on performance. There are plenty of other resources on design, inputs, outputs, and battery life, so check them out.
Hardware specs
I currently use an Intel-based MacBook Pro 16″ as my main machine (almost always plugged in) and a 2020 13″ M1 MacBook Pro as a carry-on option.
And for training larger machine learning models, we use Google Colab, Google Cloud GPUs, and SSH connections (connected over the Internet) to deep learning PCs equipped with TITAN RTX GPUs.
TensorFlow code tests also include comparisons between Google Colab and TITAN RTX GPUs.
The specs table below focuses on the MacBook Pro, Intel-based, M1, M1 Pro and M1 Max respectively.
| machine name | chips | CPU | GPUs | Neural Engine | RAM | storage | price |
| MacBook Pro 16 inch released in 2019 | Intel | 2.4Gz 8-core Intel Core i9 |
AMD Radeon Pro 5500M w/ 8GB of GDDR6 memory | none | 64GB | 2TB | $4999 USD when purchased (Sold out on official store) |
| MacBook Pro 13 inch released in 2020 | M1 | 8 cores | 8 cores | 16 cores | 16GB | 512GB | US$1699 |
| MacBook Pro 14 inch released in 2021 | M1 Pro | 8 cores | 14 cores | 16 cores | 16GB | 512GB | 1999 USD |
| MacBook Pro 14 inch released in 2021 | M1 Max | 10 cores | 32 cores | 16 cores | 32GB | 1TB | US$3299 |
Differences in hardware specs between Mac models to test.
All MacBook Pros in each experiment were running macOS Monterey 12.0.1 and plugged in.
Experiment 1: Final Cut Pro export (small vs. large video)
I make YouTube videos and educational videos that teach machine learning.
Therefore, the machines I use must be fast to render and export. These demands were one of the main reasons I bought the 2019 model 16-inch MacBook Pro with increased specs, and as a result I was able to edit videos without lag.
Additionally, the M1 Pro and M1 Max chips are aimed at professionals. Many pros edit their videos at a much higher quality than I (so far).
Each video used in the experiment was exported with both H.264 encoding (high compression and high GPU load) and ProRes encoding (low compression and low CPU and GPU load).
The reason for these experiments is Apple’s announcement that the new M1 chip has a dedicated ProRes engine.
Experiment with large videos
Experiment details:
- Video: Learn TensorFlow for Deep Learning Part 2
- Length: 4 hours
- Style: A stitched recording of about 30 screens of small videos (each video can be up to 10 minutes long)
- Quality: 1080p
| machine name | chips | encoding | Export time (hours:minutes:seconds) |
| MacBook Pro 16 inch released in 2019 | Intel | H.264 | 33:06 |
| MacBook Pro 13 inch released in 2020 | M1 | H.264 | 50:09 |
| MacBook Pro 14 inch released in 2021 | M1 Pro | H.264 | 2:00:26 |
| MacBook Pro 14 inch released in 2021 | M1 Max | H.264 | 2:02:29 |
Interestingly, the new M1 (Pro and Max) takes more than twice as long with H.264 encoding as the base M1 and nearly four times as long as the Intel-based Mac.
Also note that both the M1 Pro (up to 89% idle) and M1 Max (up to 68% idle) had a lot of hardware idle when using H.264 encoding. This is the point.
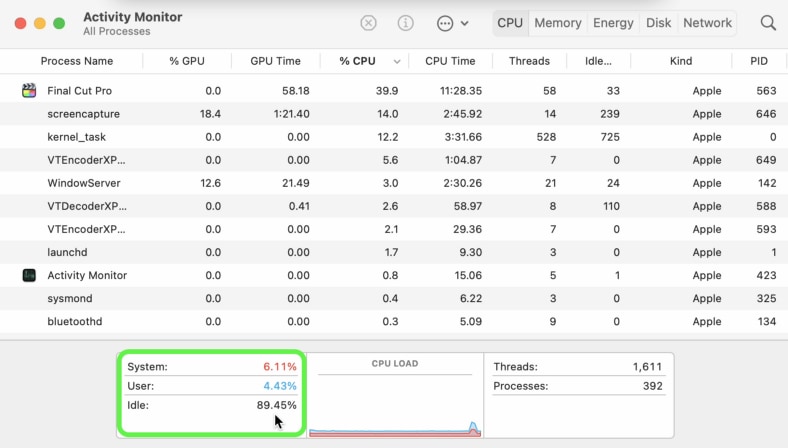
Will a software update be required to take full advantage of the new chip’s power?
But ProRes encoding is a different story.
| machine name | chips | encoding | Export time (hours:minutes:seconds) |
| MacBook Pro 16 inch released in 2019 | Intel | ProRes | 33:24 |
| MacBook Pro 13 inch released in 2020 | M1 | ProRes | 30:26 |
| MacBook Pro 14 inch released in 2021 | M1 Pro | ProRes | 12:10 |
| MacBook Pro 14 inch released in 2021 | M1 Max | ProRes | 11:24 |
For ProRes encoding, the new M1 chip really shines.
Compared to H.264 encoding, both the M1 Pro and M1 Max experienced a huge amount of CPU usage when exporting to ProRes. Is this phenomenon because these two chips have dedicated cores for ProRes?
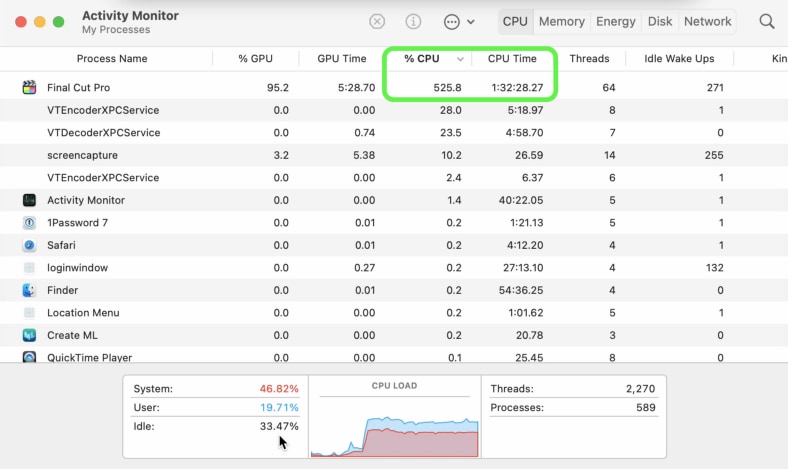
However, even though exporting with ProRes encoding is much faster than H.264, the difference in file sizes made it nearly unusable for many people.
When exporting the large video in H.264, the file size was 7GB, and when exporting in ProRes, it was 167GB.
I don’t know your internet speed, but uploading a video like ProRes encoding takes 3-4 days for me.
Experiment with small videos
Smaller videos yielded more similar results.
Experiment details:
- Video: How to Study Machine Learning 5 Days a Week
- Length: 10 minutes
- Style: Overlay the audio recorded in the video clip as a voiceover
- Quality: 1080p
| machine name | chips | encoding | Export time (hours:minutes:seconds) |
| MacBook Pro 16 inch released in 2019 | Intel | H.264 | 2:59 |
| MacBook Pro 13 inch released in 2020 | M1 | H.264 | 3:48 |
| MacBook Pro 14 inch released in 2021 | M1 Pro | H.264 | 3:28 |
| MacBook Pro 14 inch released in 2021 | M1 Max | H.264 | 3:31 |
Write times are very similar across the board.
But the M1 Pro and M1 Max chips had a lot of idle hardware when exporting to H.264 encoding.
| machine name | chips | encoding | Export time (hours:minutes:seconds) |
| MacBook Pro 16 inch released in 2019 | Intel | ProRes | 2:35 |
| MacBook Pro 13 inch released in 2020 | M1 | ProRes | 2:41 |
| MacBook Pro 14 inch released in 2021 | M1 Pro | ProRes | 1:09 |
| MacBook Pro 14 inch released in 2021 | M1 Max | ProRes | 1:05 |
The M1 Pro and M1 Max are very good when using ProRes encoding. When I checked the activity monitor, the M1 Pro showed a huge amount of CPU usage of 350-450% and the M1 Max 300-500%.
Experiment 2: Image classification with CreateML
CreateML is an Apple machine learning application that comes with Xcode (Apple’s iOS/macOS application development software).
The app provides an easy way to turn data into models for machine learning.
My brother and I were experimenting with the app to build a prototype model for Nutrify , an app that takes pictures of food and learns about it.
The app not only suited our use case, but also generated pre-trained models optimized for Apple devices.
Experiment details:
- Data: A random 10% subset of images from all classes in Food101 (using ~7,500 training images and ~2500 test images)
- Training: 25 epochs, all data augmentation settings on
- Mac model: Model with CreateML (Apple does not disclose the architecture used)
| machine name | chips | number of epochs | Total training time (min) |
| MacBook Pro 16 inch released in 2019 | Intel | twenty five | twenty four |
| MacBook Pro 13 inch released in 2020 | M1 | twenty five | 20 |
| MacBook Pro 14 inch released in 2021 | M1 Pro | twenty five | Ten |
| MacBook Pro 14 inch released in 2021 | M1 Max | twenty five | 11 |
There was no big difference between the M1 Pro and M1 Max in this experiment. Both, however, significantly outperformed the other chips.
During the training, I checked the activity monitor on the M1 Pro and M1 Max and saw heavy CPU usage with the process name “MLRecipeExcecutionService”.
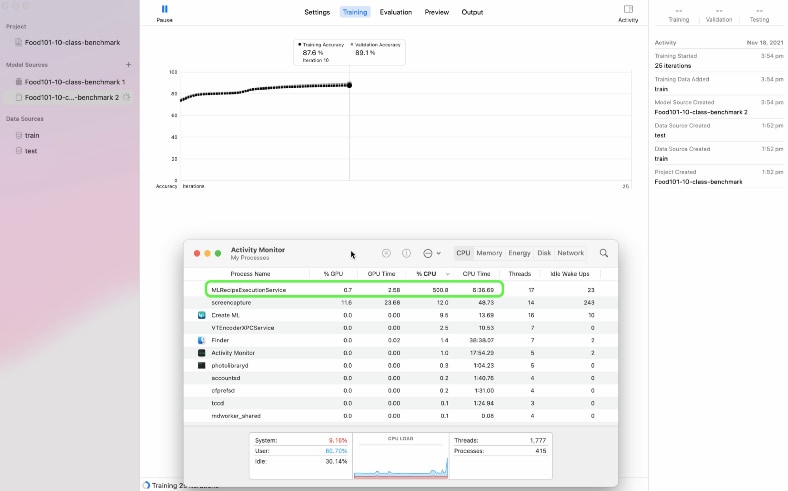
Notably, the GPU was not used at all during training or feature extraction.
From the above, it is believed that CreateML uses a 16-core Neural Engine to speed up training. However, Activity Monitor doesn’t reveal when the Neural Engine wakes up, so this assumption isn’t 100% certain.
It’s also not clear what model CreateML uses. Judging by the performance, I would guess that they are using at least a pre-trained ResNet50 model or EfficientNetB2, or a model with equal or better performance between the two.
EfficientNet is an image recognition model announced by the Google research team in 2019. Despite having fewer parameters than conventional models, it demonstrates the highest level of accuracy. It is also said to be suitable for transfer learning . A paper discussing the model can be found here and on GitHub here .
Experiment 3: Image classification with TinyVGG model for CIFAR10 using TensorFlow
CreateML has great features, but sometimes you want to create your own machine learning models.
In that case you would use a framework like TensorFlow.
I teach TensorFlow and I code with it almost every day. So I was looking forward to seeing how TensorFlow performed on my new machine.
In all of our TensorFlow tests that generate custom models, we ensured that all machines ran the same code with the same environment settings and the same dataset.
The only difference from Experiments 1 and 2, which used only MacBook Pros, was testing in Google Colab and Nvidia TITAN RTX environments against each Mac.
On each Mac I ran a combination of tensorflow-macos (TensorFlow for Mac) and tensorflow-metal for GPU acceleration . Google Colab and Nvidia TITAN RTX, on the other hand, used standard TensorFlow.
You can find the code for all the experiments and the TensorFlow on Mac setup on GitHub .
Note : There is currently no PyTorch equivalent to tensorflow -metal for accelerating PyTorch code on Mac GPUs . Currently PyTorch works only on Mac CPUs.
Details from the first TensorFlow experiment:
- Data: CIFAR10 from TensorFlow dataset (32×32 images, 10 classes, 50,000 training images, 10,000 test images)
- Model: TinyVGG model (from CNN Explainer website)
- Training: 10 epochs, batch size 32
- Code: See GitHub
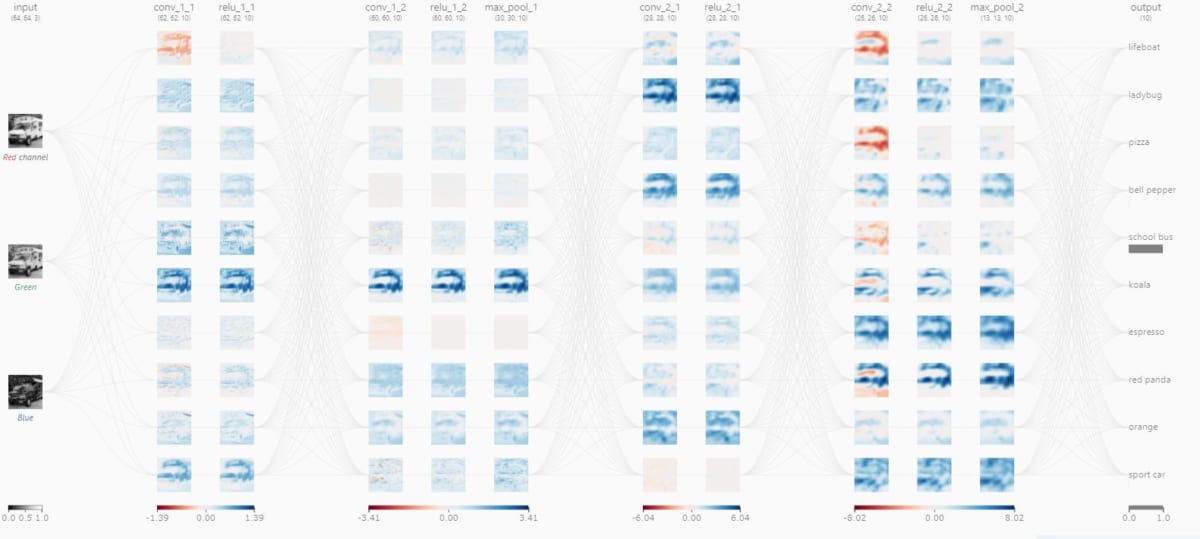 Visualization of TinyVGG’s image recognition process for school buses
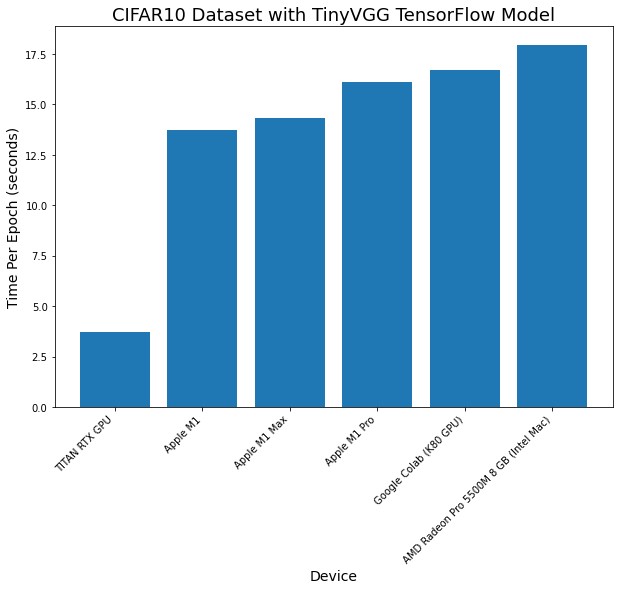
| machine name | chips | number of epochs | Total training time (min) | Time per epoch (average, minutes) |
| MacBook Pro 16 inch released in 2019 | Intel | Ten | 180 | 18 |
| MacBook Pro 13 inch released in 2020 | M1 | Ten | 137 | 14 |
| MacBook Pro 14 inch released in 2021 | M1 Pro | Ten | 161 | 16 |
| MacBook Pro 14 inch released in 2021 | M1 Max | Ten | 143 | 14 |
| Google Colab* | Nvidia K80 GPUs | Ten | 167 | 17 |
| PC for custom deep learning | Nvidia TITAN RTX | Ten | 37 | Four |
*I used the free version of Google Colab for the TensorFlow experiments. Google Colab is a great service from Google that allows you to use a GPU-attached Jupyter Notebook with little setup. The free version used to offer faster GPUs (Nvidia P100, T4), but it’s been a while since I’ve had access to them. A faster GPU is available with the Colab Pro, but it’s not yet available where I live (Australia).
It makes sense that the TITAN RTX has surpassed other machines. The chip is a GPU built for machine learning and data science.
In terms of hours per epoch, all Macs performed roughly within the same range. The M1 Max and the plain M1 machine run code in similar times.
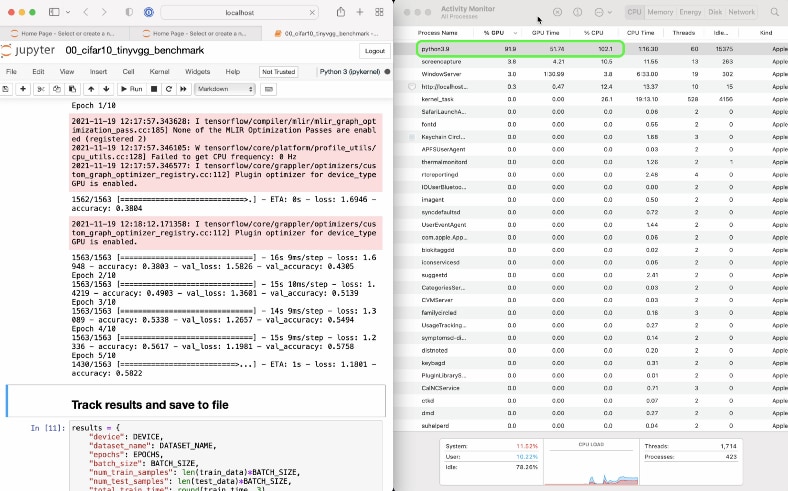
Looking at the activity monitor on each M1 Mac, we saw a lot of GPU usage during training. The phenomenon is due to Apple’s tensorflow – metal PluggableDevice , a software package that leverages Apple’s Metal GPU framework to accelerate TensorFlow .
Experiment 4: EfficientNetB0 feature extraction for Food101 dataset using tensorflow-macos
The final machine learning experiment turned out to be much larger. More and larger images than Experiment 3 were used.
One of the best ways to get great results when training machine learning models is to use transfer learning.
In transfer learning, the weights (patterns) of a trained model trained on similar data (the training data used for the model you want to develop) can be reused for the dataset of the model you want to develop.
In Experiment 4, the Food101 dataset was diverted to the transfer learning of the EfficientNetB0 model.
Experiment details:
- Data: Food101 from the TensorFlow dataset (224×224 images, 101 classes, ~75,000 training images, ~25,000 test images)
- Model: Replacing top layer of EfficientNetB0 pre-trained with ImageNet (feature extraction)
- Training: 5 epochs, batch size 32
- Code: See GitHub
| machine name | chips | number of epochs | Total training time (min) | Time per epoch (average, minutes) |
| 2019 MacBook Pro 16-inch* | Intel | Five | 3032 | 606 |
| MacBook Pro 13 inch released in 2020 | M1 | Five | 3387 | 677 |
| MacBook Pro 14 inch released in 2021 | M1 Pro | Five | 1486 | 297 |
| MacBook Pro 14 inch released in 2021 | M1 Max | Five | 959 | 192 |
| Google Colab | Nvidia K80 GPUs | Five | 2122 | 424 |
| PC for custom deep learning | Nvidia TITAN RTX | Five | 464 | 93 |
*Code run on a 16″ MacBook Pro used the SGD optimizer instead of the Adam optimizer. This is due to an open issue with tensorflow-macos running on Intel-based Macs, for which no fix has been found.
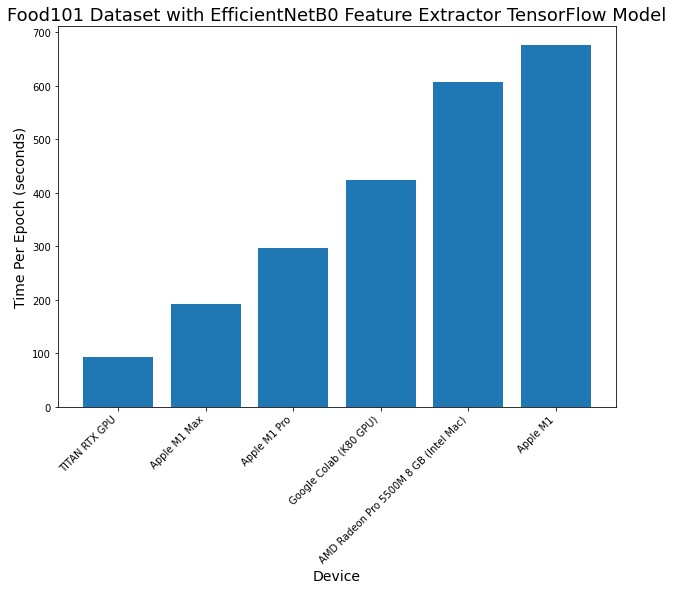
The new M1 Pro and M1 Max chips are found to be faster than Google Colab’s free K80 GPU on larger models and datasets. The M1 Max falls far short of even the TITAN RTX.
Most notable here is the performance of the M1 Pro and M1 Max when scaled up for larger experiments.
Experiment 3 yielded similar results on all Macs, but as the amount of data (both image size and number of images) increases, the M1 Pro and M1 Max far outstrip the other Macs.
The M1 Pro and M1 Max even outperform Google Colab with Nvidia’s dedicated GPU (about 1.5x faster for the M1 Pro and about 2x faster for the M1 Max).
The above results mean that the M1 Pro or M1 Max can be used to run machine learning experiments on your local machine much faster than on an online Colab notebook. So with the two chips we experimented with we get all the benefits of running locally. However, Google Colab has a nice feature that lets you share notebooks using links.
Of course, the TITAN RTX has the best performance, but the M1 Max is no less, so the latter is very impressive as a portable device.
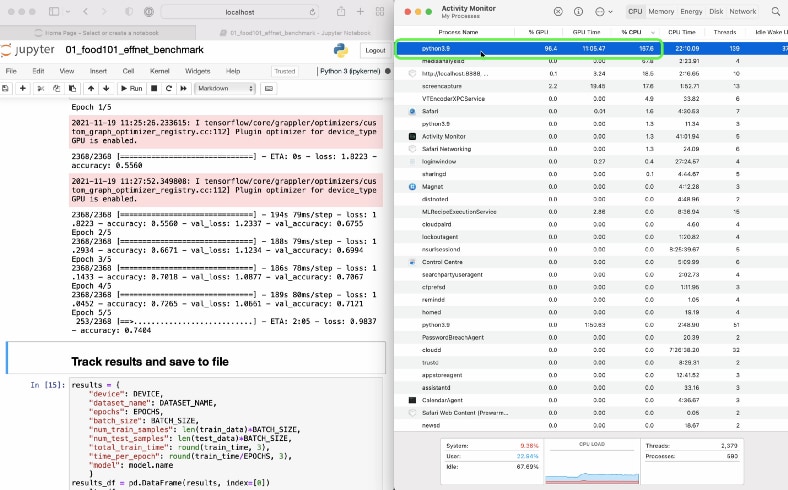
Activity Monitor showed heavy GPU usage on all devices.
Which one should i buy?
I’ve been using my 13-inch M1 MacBook Pro every day for the past year. I use it for small machine learning experiments, video editing, Google Colab browser, etc.
But now, until I feel the need to scale up my PC to TITAN RTX or the cloud, I’m considering upgrading to a 14″ MacBook Pro with M1 Pro and doing everything locally (no more Google Colab). ing.
From our testing, the 13-inch M1 MacBook Pro (I didn’t test it, but the M1 MacBook Air should perform close to the M1 MacBook Pro’s results) is still a great starting laptop. It turns out there is.
If you have the budget, the M1 Pro will definitely give you better performance.
As for the M1 Max, in my testing it struggled to justify the $1,100 price difference over the M1 Pro it’s based on. I’d rather use the difference to add local storage, more RAM, or buy a dedicated GPU.
In summary, here are my recommendations:
- 13-inch M1 MacBook Pro/MacBook Air — Still a great laptop for beginners in machine learning and data science.
- 14-inch M1 Pro MacBook Pro – A definite step up in performance from the M1 and worth it for those who enjoy the new design and have the budget to spare.
- 14-inch M1 Max MacBook Pro – The performance improvement from the M1 Pro is noticeable only when training large models, and many other performance benchmarks are on par with the M1 Pro. For those who often edit 4K videos with multiple streams, it may be one of the options.
Summary
I would love to see when and where Apple’s proprietary chips are being used.
For example, it would be cool to see how the Neural Engine is being used. Or see how CreateML is used (all M1 machines trained very quickly in the CreateML experiment).
Even better, why not write your own code to take advantage of the Neural Engine?

